How to use the tool
Download and installation
The tools are a collection of 3D Studio Max maxscripts that create some new Helper objects related to Unreal Engine asset integration. You can download the latest version of the toolset (1.0) or find the guide on my website here.
Requirements
The toolkit works with 3D Studio Max 9 and above. It should require no external dependencies or requirements. It has been tested with Unreal Engine 4.13 and above. The example scenes provided are made for UE4 4.18 in 3D Studio Max 9.
Installation
Once downloaded, simply copy the scripts into your 3D Studio MAX user scripts folder:
- Hold the Windows key on your keyboard and press R to bring up the run dialog,
- Type in %USERPROFILE%\AppData\Local\Autodesk\3dsmax\ and hit enter,
- You'll see a collection of folders, each one for a different version of 3D Studio Max that you have installed,
- Double click your version of Max's folder (eg. 2020 - 64bit), then double click the ENU folder, then double click scripts,
- Open the downloaded zip file and extract the contents into this scripts folder,
- You may need to restart 3D Studio MAX if you had it open at the time.
If all goes well, you should now see a new folder called Unrobotic UE4 API in your maxscripts directory. If you take a peek inside the startup folder, you should also see a new directory called Unrobotic Exporters. If that's the case, congratulations - the installation was a success.
A collection of example Unreal projects and 3DS max files is also included in the downloads. These can be extracted to any location and require no installation.
An overview
The Unrobotic Unreal Engine toolset is split into three main parts:
- The 'Export node' and 'Export Anims' objects to aid in getting your assets into the engine,
- The 'UE4 World' and 'UE4 Object' objects to transfer level layouts between 3D Studio Max and UE4,
- A collection of utility scripts to provide a selection of actions to help manage scenes and exported objects.
The Export Node helper
The Export Node helper can be found in the command panel's Create -> Helpers tab, under the category Unrobotic. It's the button called 'Export Node'. To add an Export Node to the scene, simply click the button in the command panel and then click in your scene.
Think of the Export Node as both the origin/pivot point/centre of the object you want to export, and the mechanism by which you tell 3D Studio Max which objects in the scene should be considered a part of this exported object. You can find more detailed information in the Export Node section of the documentation.
The Export Anims helper
The Export Anims helper allows you to define and organise the animations contained in a scene. It can be used alongside the Export Node object to easily export collections of animations for your skeletal meshes.
The UE4 World helper
The UE4 World helper represents a level from your Unreal Engine. As with the Export Node, the UE World object is best thought of as your 'origin' point for the level you're laying out. It's also the object which you'll be using to transfer your level layouts from 3D Studio Max into the UE4 editor, and vice-versa via the clipboard.
Adding a UE4 World is done the say way as the Export Node. Click the UE4 World button in the command panel and then click on the scene to place it. Keep in mind that orientation and position do matter, so it's best to create it in the Top viewport so that up in your scene is up in UE4. More information about the UE4 World can be found in the UE4 layout section of this documentation.
The UE4 Object helper
The UE4 Object helper represents a static mesh actor in your Unreal Engine level. The UE4 Object provides a means both to position instances of your exported meshes into a UE4 World and have them visually represented by your exportable object within 3D Studio Max. More information about the UE4 World can be found in the UE4 layout section of this documentation.
The various utility scripts
A collection of utility scripts are included to speed up workflow and add functionality to the tools. They include:
- Converting a selection to an exportable object with Export Node within the current Max file,
- Converting selection to Export Node in a different Max file, providing a visually linked UE4 Objects,
- Automatically splitting pre-named parts of a scene into a collection of Max files which then link to UE4 Objects,
- Batch exporting a collection of Max files to UE4 compatible FBX files (and vice versa),
- Splitting a single max scene with multiple Export Nodes into a collection of Max files,
- Combining a collection of Max files with Export Nodes into a single Max scene
The Export Node
The Export Node is a helper that lets you quickly collect objects in your scene together and determine how they are exported to the Unreal Engine. The tool can be found in the command panel's Create -> Helpers tab, under the category Unrobotic. It's the button called 'Export Node'. To add an Export Node to the scene, simply click the button in the command panel and then click in your scene.
Collecting objects together
The Export Node can work in two ways:
- Using Max's scene layers
Scene objects are collected and organised via 3D Studio Max's layer functionality. When an Export Node is played on a layer, all other objects in the same layer will be determined as being part of this exportable object. This method can be useful when you have a complex collection of meshes that are not necessarily hierarchically linked (eg. a house with four walls, a roof and a door), - Using link hierarchy
Object linking is used to determine what is considered part of the exportable object. Any objects linked to the Exporter node (and any children of said node) are determined as being part of the exportable object. This method is useful when you have a more hierarchical layout to the object you're exporting (eg. furniture with items on them).
The Export Node will work out which method you're using based on whether it has any linked objects. You can mix and match both methods in a scene (though I'd recommend a consistent approach purely to maintain sanity on a project with tons of assets). The Export Node will behave as an anchoring 'origin' point for the exported objects. Everything will be translated, scaled and rotated so that the Export Node is at [0,0,0, facing forwards at 1x scale.
Because the Export Node can determine specifically which object it's required to export, it's easy to combine a collection of assets into a single Max scene to easily maintain and export meshes. You can, however, work on the concept of a single UE4 'mesh' per Max scene. There are utilities to batch-export a collection of Max files, and you'll still get the benefits of quick and easy exporting, origin point determination, etc.
An example scene
Let's take a look at one of the scenes included in the collection of examples, Exporter - Mixed.max:
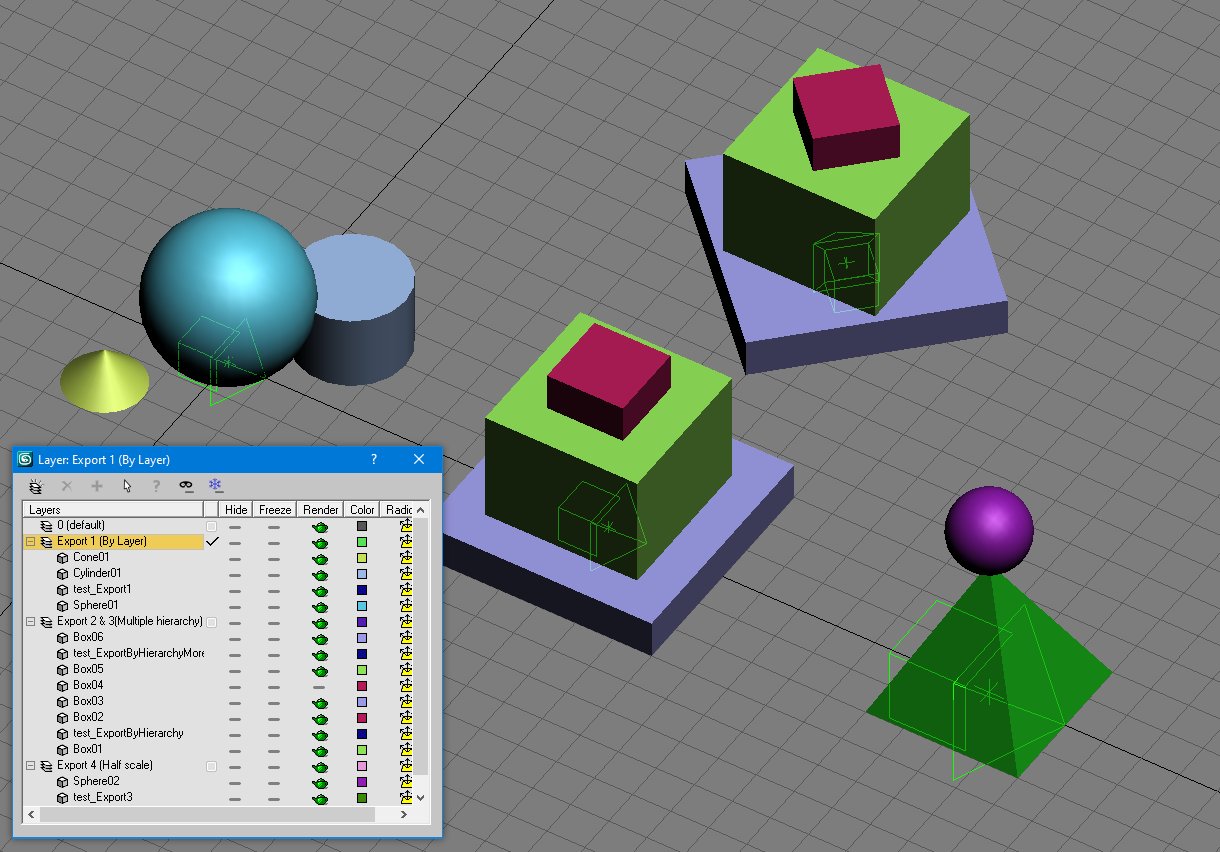
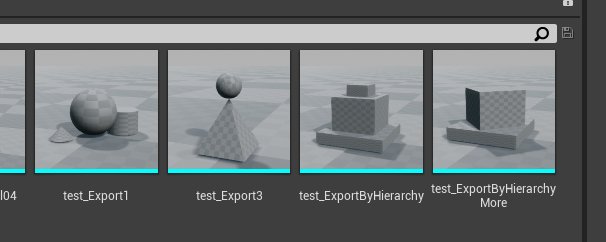
This scene above contains four Export Nodes (the green wireframe arrow). Each Export Node will output a single FBX object. By object I'm meaning something that Unreal Engine would consider as a single 'asset' or static mesh. When exporting this scene, four FBX will be placed in the destination folder:
- test_Export1.fbx containing everything in the layer called Export 1 (By Layer),
- test_ExportByHierarchy.fbx containing Box01, Box02 and Box03 (Box01 is linked to the export node),
- test_ExportByHierarchyMore.fbx containing Box05 and Box06 (Box04 is linked to the export node but set to non-renderable) rotated 45 degrees clockwise,
- test_Export3.fbx containing everything in the layer called Export 4 (Half scale) at 50% size.
The Export Node properties
If you click one of the Export Node helpers you'll see a list of properties in the command panel. Let's have a quick run through the main ones:
|  |
Exporting multiple nodes
While the command panel above allows you to export the selected Export Node, a much more useful feature is the ability to export the entire scene and each of its Export Node helpers. You can use the included utility macro called 'Export all (or selected) Export Nodes in the scene'. This macro is found in the Customize User Interface dialog and is found under the Unreal Engine 4 category. It can be mapped to your toolbar, menu or keyboard shortcuts as you see fit.
When run, the Export all (or selected) macro will show a File Save As dialog and ask you to specify the destination path and filename. A few things to note here:
- If no nodes are selected when the macro was run all Export Nodes in the scene are exported, one by one. If Export Nodes (or any of the objects they export) are selected when the macro is run, only those selected Export Nodes will be exported. This allows you to select exact groups of node to export,
- Any Export Node that is set to non-renderable (in object properties, or in the layer manager) will not be exported. This allows you to control which objects you permanently want to prevent from exporting,
- The Export Node will remember the file location that you export to per-scene and automatically fill it in next time you export. This location is remembered relative to the max scene file (so sharing between machines will remember correct export locations as long as your source asses and Unreal Project are on the same drive),
- The filename is not necessarily the name of the FBX that will be exported. If the Export Node has either of the 'Prefix / Suffix export filename' options turned on, the filename you submit here will be used. For example, if you export as 'doop.fbx', an object called test_Export1 would be exported as doop_test_Export1.fbx or test_Export1_doop.fbx depending on the options turned on.
Once a file name and path are specified the Export Nodes will be processed and an Unreal-compatible FBX will be created. Personally, I tend to export straight into the Unreal Engine Content folder so that UE4 picks up the asset and imports it automatically. Exporting straight into the Content folder also means that it's very easy to update the exported meshes later on without having to manually re-import in UE4.
Skeletal meshes and characters
The Export Node also works with skeletal-animated meshes. There is an included sample scene Exporter - Skeletal Character.max showing a simplified version of the typical kind of workflow that I use. Note that there are some important things to remember when it comes to exporting bones. Skeletal animation and exporting is covered in depth in the Export Anims section of this documentation.
UE4 World
Asset management and exporting is only half of the Unrobotic UE4 toolkit. Another ability of the tools is to lay out your levels in 3D Studio Max and then bring that into the Unreal Engine quickly and easily (and vice-versa). To help with level layout, the toolkit provides two object types - UE4 World and UE4 Object. This section takes a look at the former.
UE4 World
The UE4 World object is a representation of an Unreal Engine level/world that is placed in your scene in Max. The helper object can be considered the center of the world, or [0,0,0]. Let's open the example scene Practical Example - Level Layout.max provided and take a look at what's in it:
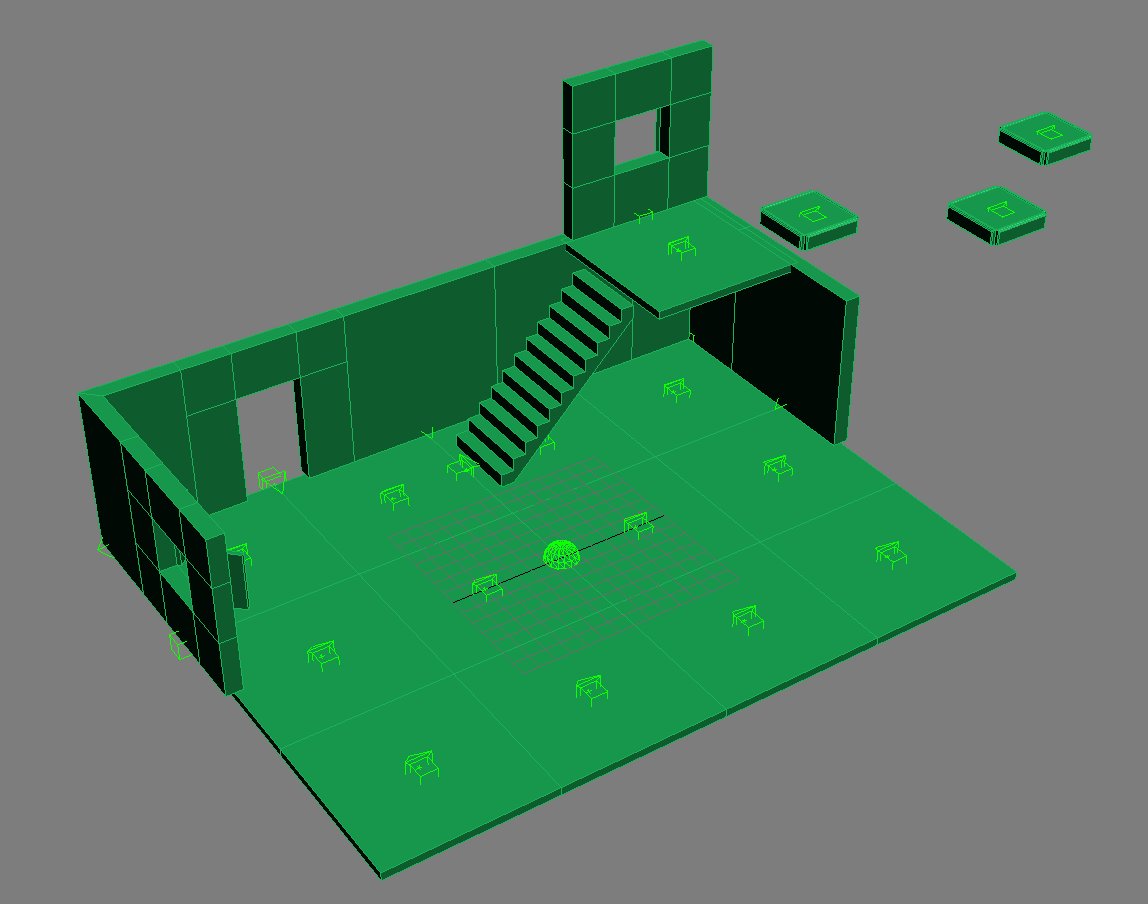
The UE4 World helper can be seen above at the centre of the level, represented by a wireframe sphere and an arrow showing 'forward' in the Unreal Engine (right in 3ds Max). As with the Export Node previously, clicking the object will bring up its properties. Here's a quick look through the important ones:
|  |
Transferring into Unreal Engine 4
The main function of the UE4 World is to allow you to synchronise your scene between Max and UE4. It does this via the windows clipboard. In the example scene above, selecting the UE4 World object and then pressing the Copy button in the node's command panel will place 25 static mesh actors into the UE4 clipboard. The example Unreal Engine project provided includes pre-prepared level called BlankLevel. This level is clear apart from some preset lighting. Opening this in the Unreal Engine and selecting Edit->Paste, or pressing CTRL+V will place these 25 actors into the world:
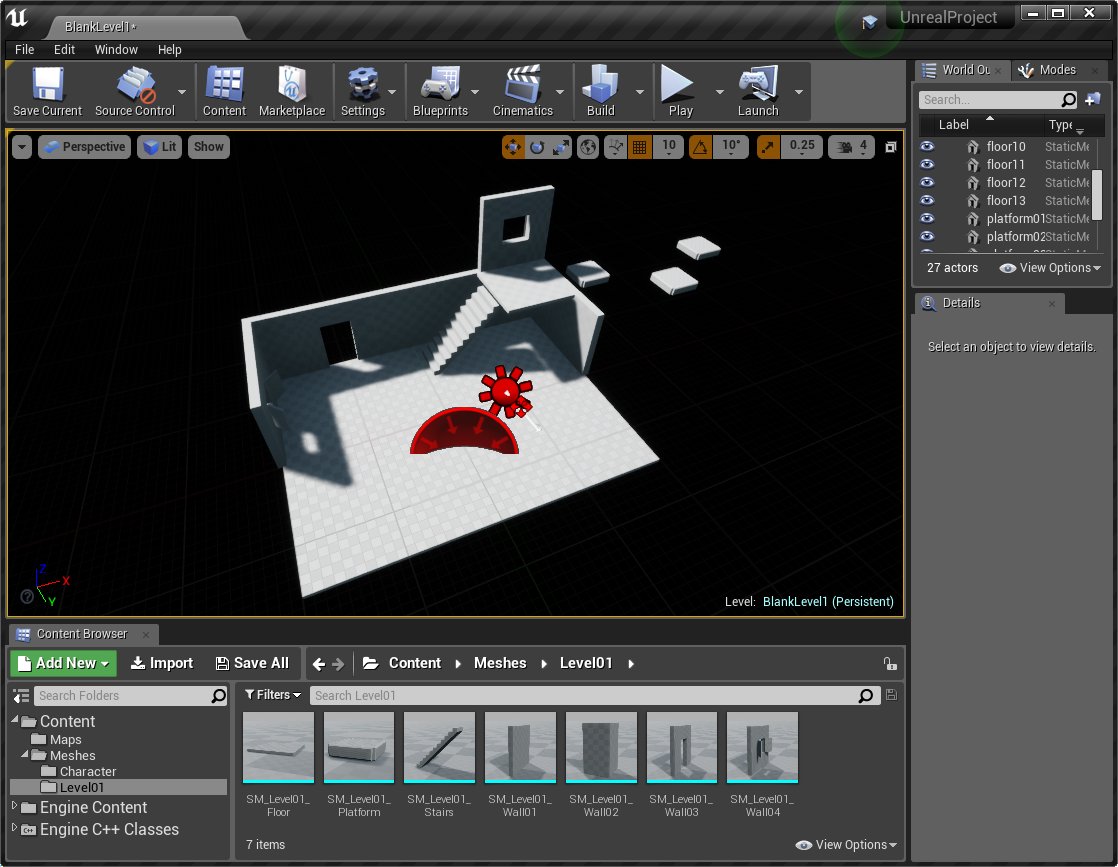
The pasted actors all contain correct references to the SM static mesh assets that were previously exported from 3D Studio Max using the Export Node tool. Actors are all positioned, orientated and scaled correctly.
This world transfer goes both ways. Another included example scene demonstrates this following the steps below:
- Copy the static mesh objects in the Unreal Engine,
- Switch to Max and open the Practical Example - Level Layout (Empty).max example,
- Select the UE4 World object in the middle of the scene,
- Click the Paste button in the UE4 World command panel.
This results in the static mesh actors from the Unreal Engine clipboard being recreated in the Max scene. A UE4 Object is created for each static mesh actor and a visual representation (based on the Export Node scene) is xrefed into the viewport. This xref mesh moves with the UE4 Object and can be updated or refreshed if the asset Max file is changed:
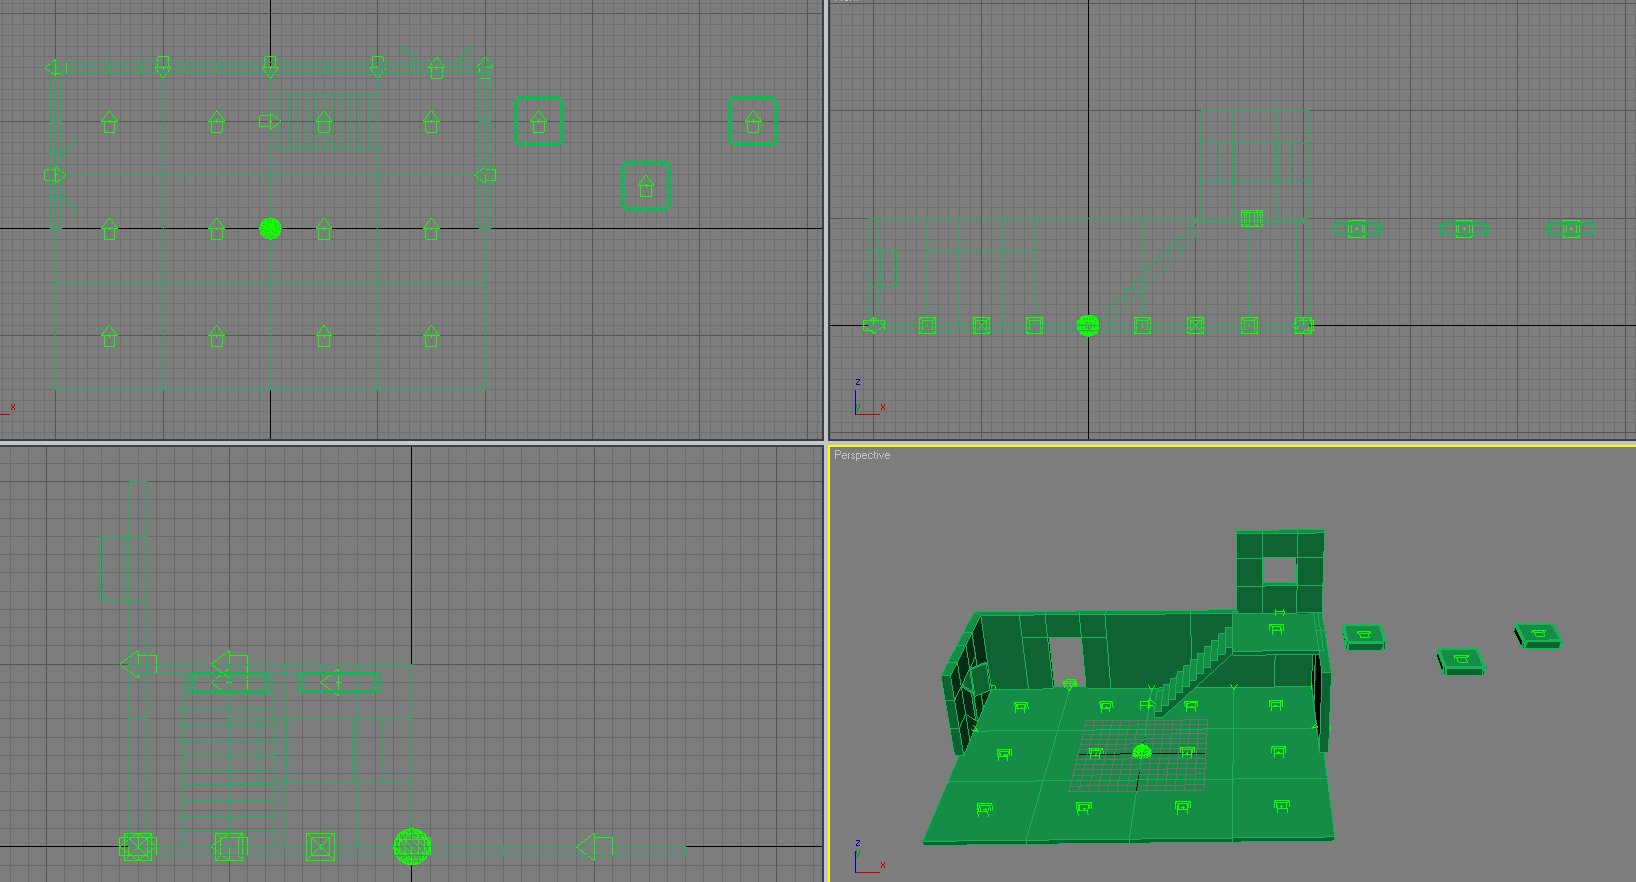
You can freely transfer back and forth between UE4 and Max. Two utility macros are also included that can be mapped to the menu, keyboard or toolbar that make this step much simpler:
- Copy objects from the scene to the UE4 clipboard will find the first UE4 World object in the scene and copy the objects to the clipboard. This has both the advantage that you don't have to select the UE4 World object and scroll the command panel, and that it respects the current Max selection. For example, selecting just the platforms and running the Copy Objects macro would only copy said platforms to the clipboard,
- Paste objects into the scene from the UE4 clipboard as with the Copy macro, the Paste objects utility will find the first UE4 World object and transfer the UE4 clipboard into the scene.
Multiple worlds in a single scene
When you create a scene with a number of UE4 World objects, layers are used to determine which UE4 Objects belong to which UE4 World. If a world instance is on the default 0 layer it will assume all UE4 Objects in the scene (regardless lf layer) as being part of the world. If a UE4 World object is on a custom layer it will only consider other UE4 Objects on the same layer as belonging in that world. UE4 Objects can be parts of multiple worlds.
Ignoring specific objects
You can provide specific UE4 Objects that the world should ignore via ignore_ user-defined properties. For example, if you wanted to make sure an object called box01 was not included as part of the world, you would add the following to the world's user-defined properties:
ignore_box01=true
You can use either the object name, or the custom name you have provided in a UE4 Object's properties.
UE4 Object
The UE4 Object helper is used to visually represent and manage static meshes in the Max viewport. They are visually similar to the Export Node helpers, but always have the x-axis as their forward direction to match the Unreal Engine. They also cannot be used to Export data from max and are purely for asset positioning, tracking and representation.
UE4 Object properties
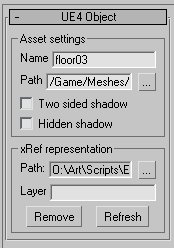
As with the Export Node and UE4 World helpers, clicking an object helper will display it's properties in the command panel. Here's a quick look through them:
|
|
Adding UE4 Objects to the world
UE4 Objects can be added manually by simply clicking the UE4 Object button in the command panel and clicking the viewport. By default they are not assigned a Name, Path or xRef. A general process for manually adding a static mesh is:
- Make sure you have an existing UE4 World helper in the scene and configured correctly,
- Select the UE4 Object button in the command panel and click the viewport to add,
- Select the newly placed UE4 Object and enter the modify command panel to view its properties,
- Click ... in the xRef representation area to browse for the Max file that represents this object,
- Select the Max file. The viewport will update to show the selected scene.
The Asset Path will also update to find the best matching .uasset in the UE4 Content folder.
Note that the tools expect the xref'd Max scene to match the name of an Unreal Engine uasset located in the Contents folder to automate Path generation. For example, xRefing SM_Level01_Wall01.max will automatically update the Path to /Games/Meshes/Level01/SM_Level01_Wall01.SM_Level01_Wall01 if a file called SM_Level01_Wall01.uasset is found in Contents/Meshes/Level01/.
Also note that the tool assumes every static mesh asset to have a unique filename. If multiple assets in different folders contain the same name, the first one found will be referenced in the Path value.
If it doesn't seem to be working, make sure that you have added a UE4 World object to the scene and correctly set the Contents and Source folder paths in its properties. You can also manually change the Path value if it cannot be correctly determined or you need to have it show a specific value.
Pasting UE4 Objects from the Unreal Engine
If you have a UE4 World helper in the scene and use it to paste actors from an Unreal Engine clipboard, UE4 Objects will automatically be created. Similarly to how the UE4 uasset is determined by the scene name, the Asset Path and xRef filename are determined by the UE4 Asset name when pasting. Again, the tools assume that each asset Max file will have it's own unique filename.
Copying/cloning and deleting UE4 Objects
You can also copy and clone UE4 Object nodes in the scene. Cloning an existing object will automatically xref a new instance of the max scene visually representing it. When deleting a UE4 Object, the xref'd objects will automatically be de-referenced and removed from the scene.
Export Anims
The Export Anims helper is used to configure and manage animations in your scene to be exported. Each helper provides an animation table that lets you provide a name, start frame and end frame for a collection of animations in a specified selection of objects. Exporting to Unreal Engine is a one click process that provides a single FBX file per animation.
Export Anims properties
As with the Export Node, clicking an Export Anims helper will display its properties in the command panel. Here's a quick look through them:
|
|
The provided scene Exporter - Skeletal Character.max contains an example export setup and shows best practices of combining both Export Node and Export Anims helpers in a character animation file. Let's take a quick look at the file and see how it works:
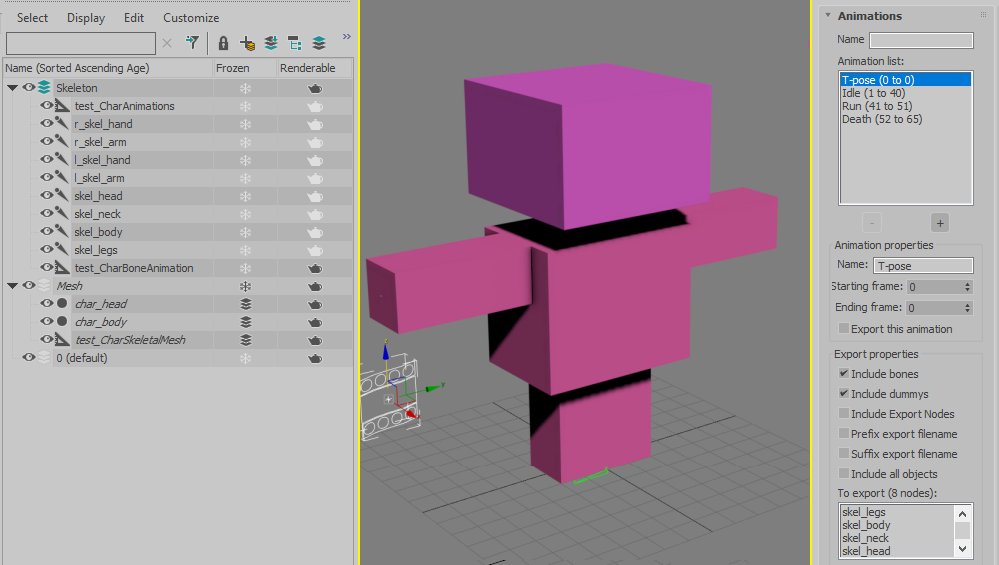
The structure of the scene
If you take a look on the left, you can see the scene explorer (with Sort by Layer turned on so that we can see the relationship to layers). There are two new layers that have been created:
- Mesh contains the mesh information related to the character. In this instance, it's two Editable Polygons - one for the head and one for the body. Both objects have a skin modifier which is linked to a skeletal rig. There is also a single Export Node helper (test_CharSkeletalMesh).
- Skeleton contains the bone rig for this character, as well as a second Export Node helper called test_CharBoneAnimation and an Export Anims helper called test_CharAnimations.
The Export Anims helper has four sets of animations defined:
- T-pose ranging from frame 0 to 0. It is disabled (Export this animation unchecked) so that it is not exported,
- Idle ranging from frame 1 to 40 - A looped idle animation,
- Run ranging from frame 41 to 51 - A looped running animation,
- Death ranging from frame 52 to 65 - A death animation,
Note that the animations should end on the same animated frame as they start. For example, Run has the same bone transformations in frame 1 as it does in frame 40. This is how Unreal Engine expects the animation and will ignore the last frame to provide a smooth loop point.
Why are there two Export Nodes?
The first Export Node on the Mesh layer (test_CharSkeletalMesh) is responsible for exporting the Skeletal Mesh into Unreal Engine. If you click it and take a look at its properties in the modifier panel, you can see that Include all objects has been checked, and Ignore bones has been unchecked. This means that when exporting, the layer will be ignored and all meshes and bones will be exported.
The second Export Node on the Skeleton layer (test_charBoneAnimation) only has Ignore bones unchecked. Because it's in the Skeleton layer, only the objects in this same layer will be exported - in this case the animated skeleton. However, if you look closely at the scene layout you'll see that it has its renderable property set to false. That means that this Export Node will never be exported.
The key to this working is the final Export Anims helper (test_CharAnimations). If you click it and have a look at the properties you'll find that it has been set to ignore bones and dummies and use Export Nodes as its source of objects. Because we have the test_charBoneAnimation helper on the same layer as this Export Anims object, it will use the objects that make up part of that Exporter.
Exporting the skeletal mesh
The skeletal character mesh is exported using the usual Export Node process. For this example you would click test_CharSkeletalMesh in the Mesh layer and use the Export FBX option. This will export both the skeletal rig and the polygon mesh to an FBX which Unreal Engine can then read.
Exporting the animations
The Export Anims helper called test_charAnimations is used to export the animations defined. In this example it's as easy as selecting the test_charAnimations helper and clicking the Export FBX button in the modifiers panel. As with Export Nodes, you'll be asked for a destination path. This destination path is stored in the max file (and shared with Export Nodes in the same scene). The file name you pick is ignored (unless you turn on the prefix/suffix options) and the Export Anims name is used as a suffix. The main part of the export filename is the animation name from the table.
In the example scene you can see that we have four animations configured. T-pose, Idle, Run and Death. T-pose has been set so that it doesn't export (it is of no use to use in UE4 as it's included in the exported mesh). When you click Export FBX and select the place to export to, the helper will create three FBX, one for each animation.
- test_CharAnimations_Idle.fbx
- test_CharAnimations_Run.fbx
- test_CharAnimations_Death.fbx
These FBX can then be simply imported into Unreal Engine and pointed at your exported character's skeleton. Note that any active (renderable) Anim Export nodes will also be exported in the scene when using the Export all (or selected) script utility. Exporting will be done after any Export Nodes in the scene so that your skeleton will exist in Unreal Engine, ready to link to the animations.
A level has been provided in the example Unreal Engine project that shows the exported results in action.
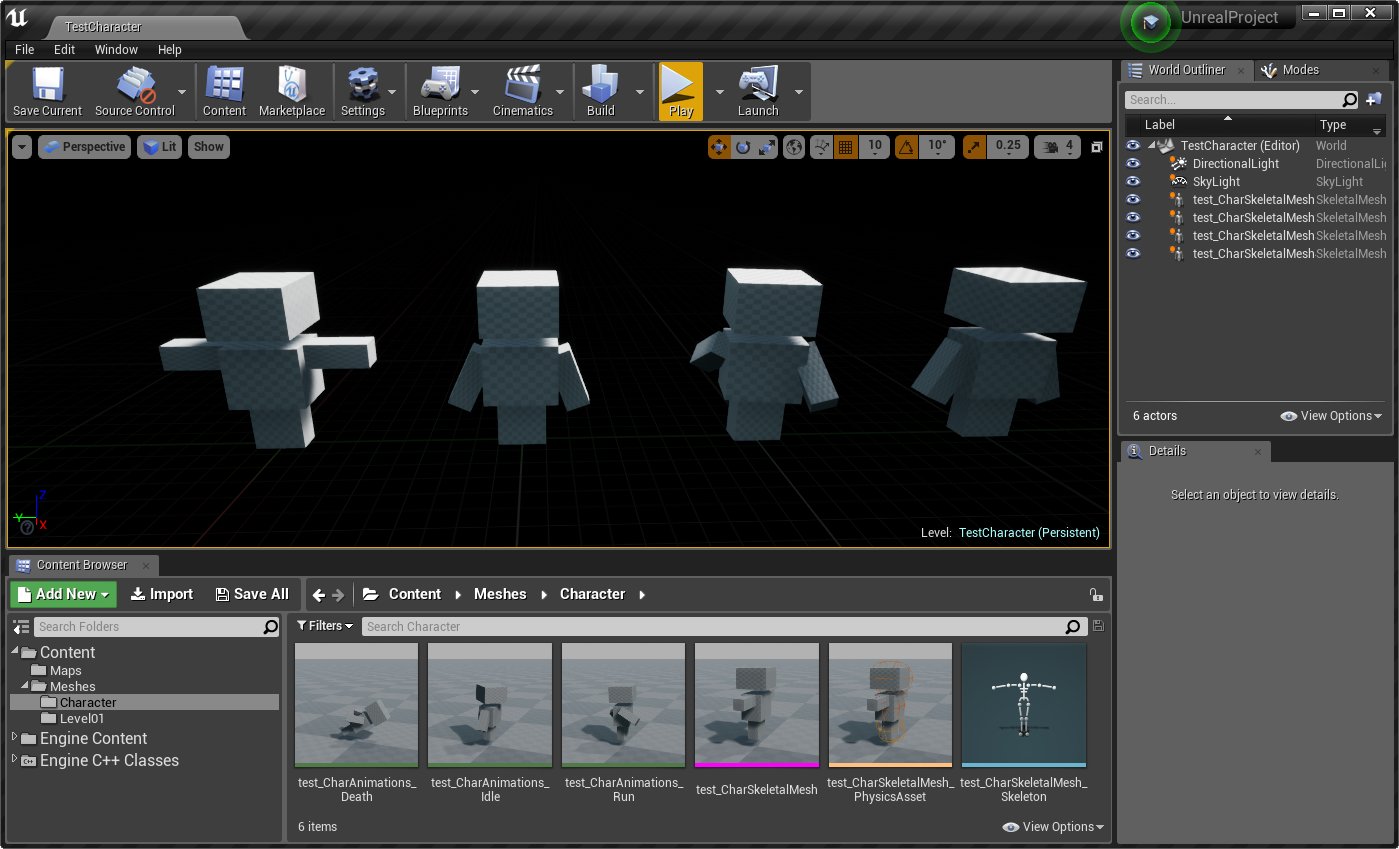
Best practices with skeletal animation exporting
Because skeletal models can be so complicated there are a few things to keep in mind when configuring your scene and exporting:
- Always try to keep the Export Node at 0.0, 0.0, 0.0
The Export Node helper will try to compensate when it finds an export helper that is not at the world's origin. 90% of the time this should work fine for example objects and meshes. However, it can run into problems if you have IK or constraints location-specific animation. For complex characters or rigs it's recommended to keep any Export Nodes that will be used for characters at the very center, 0,0,0, of your scene.
While the ideal workflow is one character per max scene, you can still include multiple characters by using different layers. You'll have to adjust the workflow slightly, though (for example, putting the mesh and rig on the same layer).
- Exporting animations uses max fetch/hold trickery
To export the FBXs correctly for each animation in the table, the toolset is exporting/importing animation data in the background. To ensure that your scene is restored to how it was when first running the export the fetch and hold features are used. Keep this in mind when exporting animations. It's best to save your scene before running the export tool. Any existing held scene will be overwritten.
Utility scripts
Alonside the three new helper objects provided, the toolset also includes a collection of scripts to help speed up getting your art from Max to Unreal, and vice versa. The macroscripts can all be assigned to the Menu, Toolbar, Keyboard shortcuts or Quads as required.
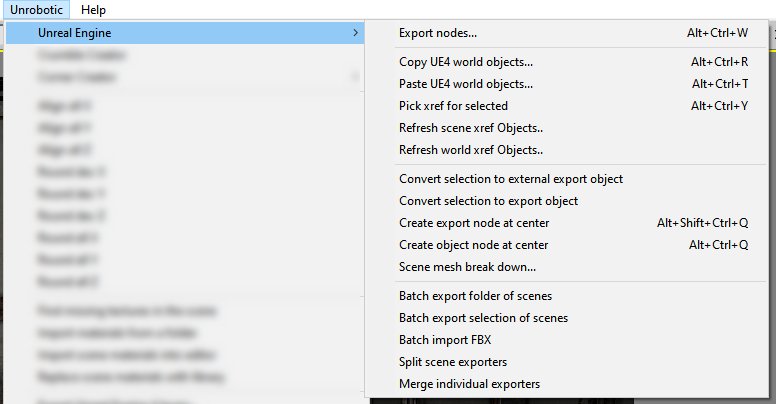
Let's take a look through each one in detail below with a use-case example:
Export all (or selected) Export Nodes in the scene
This macroscript will go through each Export Node and Export Anims helper in the scene and export them to an FBX file. You will only be asked to provide a file path and name for the first export, with each subsequent helper being exported using the same destination.
If nothing in the scene is selected, all Exporter Nodes and Export Anims will export. If you select specific nodes (or any meshes and nodes that belong to them), only the selected Export Nodes/Anims will be exported.
To use, simply run the macroscript, select your destination filename and press Save.
Re-export nodes...
The same as above but without prompting for a filename (unless you have not yet specified one). This lets you quickly iterate updates to your meshes. To use, simply run the macroscript.It also uses the same object selection as your last export. Note that any exporters that exporter's renderable property will still be respected.
Create export node at center
Create a new Export Node at the centre of the selection of max objects. Note that the pivot point's z coordinate will be used rather than the centre. To use, select some objects in the scene and run the macroscript. The newly created node will be selected.
Create object node at center
The same as above, but creates a new UE4 Object helper at the centre of the selection of max objects. To use, select some objects in the scene and run the macroscript. The newly created node will be selected.
Pick xref for selected
Pick the xRef scene that should visually represent the selected UE4 Object nodes. This will replace any existing xRefs and also try to update the Path property of each UE4 Object if a UE4 World helper exists and is configured correctly. To use, select the UE4 Objects you wish to assign an xref scene to and run the macroscript. Select the max scene that should be used and hit Open. Note that if no selection is made when the script is run, all UE4 Objects will be set.
Refresh object xref scenes
Refresh the xref scenes for the selected UE4 Objects. This will only apply to objects that have been assigned an xref scene. This will also try to update the Path property if a UE4 World exists with a correctly configured Content value. To use select the UE4 Object helpers to refresh and run the macroscript. Note that if no UE4 Object is selected all objects are updated.
Refresh world xref scenes
Similar to above but updates all UE4 Object xrefs that belong to the currently selected UE4 World. To use, select the UE4 Worlds you wish to update and run the macroscript. Note that if no selection is made when the script is run, all UE4 Worlds will be processed.
Paste UE4 world objects
Paste objects into the scene that have been copied to the clipboard from the Unreal Engine. This is basically the same as pressing the Paste button in the UE4 World objects. Note that this will automatically use the first found UE4 World helper. If you want to paste into a specific UE4 World it's recommended that you use the Paste button in the world's properties.
Copy UE4 world objects
Copy objects from the scene to the clipboard so that they can be pasted into the Unreal Engine. This is basically the same as pressing the Copy button in the UE4 World objects. Note that this will automatically use the first found UE4 World helper. If you want to copy from a specific UE4 World it's recommended that you use the Copy button in the world's properties. To use, run the macroscript.
Note that if you have a collection of UE4 Objects selected only those objects will be copied to the clipboard.
Batch export folder of scenes
Batch-export a folder of .max files. This is an automated process that will open each .max file and run the Export all Export Nodes in the scene utility. The save dialog will only appear once and will be used for all .max scenes processed. To use, run the macroscript and select the folder you wish to export then select the destination path and filename you wish to export to.
Note that this may take some time and the max instance will appear to flicker while it's batch processing. The script will try to hold and fetch your current scene, but it's recommended that you save your current work before running this utility.
Batch export selection of scenes
Similar to above, but allows you to select a collection of .max files rather than a folder, and processes each of those. To use, run the macroscript and select the .max scenes you wish to export then select the destination path and filename you wish to export to.
Batch import FBX
Batch import a folder of FBX files. This allows you to quickly re-import meshes you've exported to Unreal Engine. To use, run the macroscript and select the folder you wish to import, then select the destination path and filename you wish to save the .max files.
Note that this feature is recursive and all FBX in the folder and all subfolders will be imported.
Split scene exporters
This will take a .max file that contains mulitple Export Node helpers/layers, and export individual .max files for each one. This is useful if you want to separate your meshes that may be unrelated or are resource-heavy. To use, open the scene that you wish to split, run the maxscript and then select the destination folder you wish to split to. Hit Save.
Note that this may take some time and the max instance will appear to flicker while it's batch processing. The script will try to hold and fetch your current scene, but it's recommended that you save your current work before running this utility.
Merge individual exporters
The opposite to the above utility. This will take multiple .max files and merge them into a single scene. Each max file will be given it's own layer in the scene and offset to the right. To use, create a new scene and run the maxscript. Select the folder of .max scenes you wish to merge and press Open.
Note that this may take some time and the max instance will appear to flicker while it's batch processing. The script will try to hold and fetch your current scene, but it's recommended that you save your current work before running this utility.
This will also quiely import. Duplicate materials will automatically use the existing scene materials and duplicate nodes will be merged with the same names.
Convert selection to external export object
This utility does the following on the selected objects:
- Export the selection as a separate .max file,
- Insert a new Export Node into this new .max file,
- Remove the selection from the current scene,
- Insert a new UE4 Object object into the scene,
- Set the UE4 Object's xRef to point to the newly separated .max file
It's basically a quick way to go through objects in the scene and create individual exportable assets from them, keeping them in-place to later copy/paste into UE4.
To use, select your objects, run the maxscript and choose a filename to save the new .max to. Press Save.
Convert selection to export object
This is similar to the previous utility, but keeps the Export Node and objects/meshes in the current scene (without creating a new xrefed UE4 Object). This lets you similarly create individual exportable meshes, but keep them contained in the same scene.
To use, select your objects and run the maxscript.
Troubleshooting
This page might help if you're stuck or something's not quite working as expected. Have a scan through the issues and solutions below:
When copy-pasting into between, my objects appear but have no static mesh or visual appearance
The process of copy-pasting objects from 3dsmax to Unreal Engine relies on the following:
- Make sure your scene has an instance of a UE4 World object that is either on the default layer (0) or is on the same layer as the meshes you're copying,
- Ensure that the UE4 World instance has the Content and Source properties correctly set to paths on your machine. You can use the ... buttons to select a folder via the browse dialog. The paths can also be relative to the max scene file (eg. ..\meshes\test),
- Check that the Path property of each UE4_Object is correct. This should be a UE4-style patch to the static mesh (eg. /Game/Rooms/Furniture/ap10_box01.ap10_box01). If you have correctly set the Content property in the UE4 World as mentioned above, this field should automatically be filled in when you select an xRef mesh for a UE4 Object,
- For the above functionality to work a .uasset file must exist somewhere in the Content folder with the same filename as the xRef scene file name. Similarly, when pasting into max a .max file must exist somewhere in the Source folder with the same filename as the Unreal Engine static mesh path.
Files
Get 3dsmax Unreal Engine toolset
3dsmax Unreal Engine toolset
A collection of tools to help get 3dsmax models into Unreal Engine
| Status | Released |
| Category | Tool |
| Author | Unrobotic Games |
| Tags | 3dsmax, exporter, FBX, pipeline, Unreal Engine |

Leave a comment
Log in with itch.io to leave a comment.